
完整的 SSM 整合 demo 我已经放到了 GitHub 上,点击这里跳转…
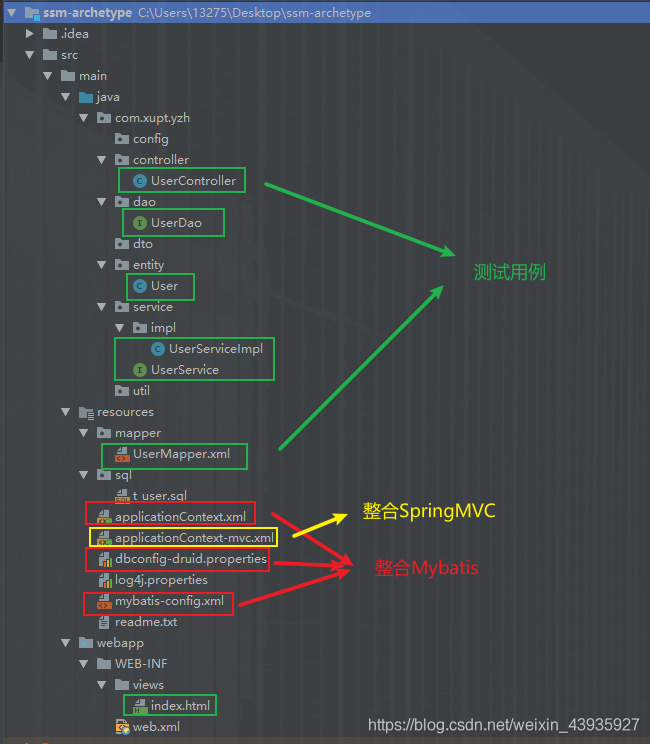
本篇只是贴出来其中最重要的三个配置文件
- applicationContext.xml
- applicationContext-mvc.xml
- web.xml
Spring 整合 Mybatis
<?xml version="1.0" encoding="UTF-8"?>
<beans xmlns="http://www.springframework.org/schema/beans"
   xmlns:xsi="http://www.w3.org/2001/XMLSchema-instance"
   xmlns:context="http://www.springframework.org/schema/context"
   xmlns:tx="http://www.springframework.org/schema/tx"
   xsi:schemaLocation="
      http://www.springframework.org/schema/beans http://www.springframework.org/schema/beans/spring-beans.xsd
      http://www.springframework.org/schema/context http://www.springframework.org/schema/context/spring-context-4.3.xsd
      http://www.springframework.org/schema/tx http://www.springframework.org/schema/tx/spring-tx-4.3.xsd">

   <!-- 开启注解 (可以向IOC中注入)-->
   <context:annotation-config/>
    <!-- 扫描注解(除了controller外),将 controller 交给 SpringMVC 容器去管理 -->
   <context:component-scan base-package="com.xupt.yzh">
      <context:exclude-filter type="annotation" expression="org.springframework.stereotype.Controller"/>
   </context:component-scan>

   <!-- 与mybatis整合 -->
   <!--  sqlSessionFactory  -->
   <bean id="sqlSessionFactory" class="org.mybatis.spring.SqlSessionFactoryBean">
      <!-- mybatis全局配置文件 -->
      <property name="configLocation" value="classpath:mybatis-config.xml"></property>
        <!-- 数据源 -->
      <property name="dataSource" ref="pooledDataSource"></property>
      <!-- mapper文件 -->
      <property name="mapperLocations" value="classpath:mapper/*.xml"></property>
   </bean>

    <!--  数据源,druid连接池     -->
    <context:property-placeholder location="classpath:dbconfig-druid.properties" ignore-unresolvable="true" />
    <bean id="pooledDataSource" class="com.alibaba.druid.pool.DruidDataSource" destroy-method="close">
        <property name="url" value="${jdbc.url}" />
        <property name="username" value="${jdbc.username}" />
        <property name="password" value="${jdbc.password}" />
        <property name="driverClassName" value="${jdbc.driver}" />

        <!-- 基本配置:-->
        <property name="filters" value="${filters}" />
        <property name="maxActive" value="${maxActive}" />
        <property name="initialSize" value="${initialSize}" />
        <property name="maxWait" value="${maxWait}" />
        <property name="minIdle" value="${minIdle}" />
        <property name="timeBetweenEvictionRunsMillis" value="${timeBetweenEvictionRunsMillis}" />
        <property name="minEvictableIdleTimeMillis" value="${minEvictableIdleTimeMillis}" />
        <property name="validationQuery" value="${validationQuery}" />
        <property name="testWhileIdle" value="${testWhileIdle}" />
        <property name="testOnBorrow" value="${testOnBorrow}" />
        <property name="testOnReturn" value="${testOnReturn}" />
        <property name="maxOpenPreparedStatements" value="${maxOpenPreparedStatements}" />
        <property name="removeAbandoned" value="${removeAbandoned}" />
        <property name="removeAbandonedTimeout" value="${removeAbandonedTimeout}" />
        <property name="logAbandoned" value="${logAbandoned}" />
    </bean>

    <!-- 配置扫描器,将mybatis接口的实现加入Ioc(代理)-->
    <!-- 注:上面的component-scan无法处理@Mapper,因为@Mapper是mybatis的注解,而且标识的是接口并不是一个class -->
    <bean class="org.mybatis.spring.mapper.MapperScannerConfigurer">
        <!-- 扫描所有dao接口 -->
        <property name="basePackage" value="com.xupt.yzh.dao"></property>
    </bean>

   <!-- 配置事务 -->
   <bean id="transactionManager" class="org.springframework.jdbc.datasource.DataSourceTransactionManager">
      <!-- 控制住事务源 -->
      <property name="dataSource" ref="pooledDataSource"></property>
   </bean>
    <!-- 可通过注解控制事务 -->
   <tx:annotation-driven/>

</beans>
Spring 整合 SpringMVC
<?xml version="1.0" encoding="UTF-8"?>
<beans xmlns="http://www.springframework.org/schema/beans"
   xmlns:xsi="http://www.w3.org/2001/XMLSchema-instance"
   xmlns:context="http://www.springframework.org/schema/context"
   xmlns:mvc="http://www.springframework.org/schema/mvc"
   xsi:schemaLocation="http://www.springframework.org/schema/mvc http://www.springframework.org/schema/mvc/spring-mvc-4.3.xsd
      http://www.springframework.org/schema/beans http://www.springframework.org/schema/beans/spring-beans.xsd
      http://www.springframework.org/schema/context http://www.springframework.org/schema/context/spring-context-4.3.xsd">

   <!-- 配置SpringMVC容器,扫描controller-->
   <context:component-scan base-package="com.xupt.yzh" use-default-filters="false">
      <!-- 只扫描控制器 -->
      <context:include-filter type="annotation" expression="org.springframework.stereotype.Controller"/>
   </context:component-scan>

   <!--  配置视图解析器 -->
   <bean class="org.springframework.web.servlet.view.InternalResourceViewResolver">
      <property name="prefix" value="/WEB-INF/views/"></property>
      <property name="suffix" value=".html"></property>
   </bean>

    <!-- 必须放在<mvc:annotation-driven>之前 -->
    <bean class="org.springframework.web.servlet.mvc.method.annotation.RequestMappingHandlerAdapter">
        <!-- 消息转换器,解决responseBody返回中外乱码问题 -->
        <property name="messageConverters">
            <list>
                <bean class="org.springframework.http.converter.StringHttpMessageConverter">
                    <property name="supportedMediaTypes">
                        <list>
                            <value>text/plain;charset=UTF-8</value>
                            <value>text/html;charset=UTF-8</value>
                            <value>applicaiton/javascript;charset=UTF-8</value>
                        </list>
                    </property>
                </bean>
            </list>
        </property>
    </bean>

    <!-- 两个标配 -->
    <!-- 开启springMVC相关注解支持,支持springmvc一些更高级的功能 jsr303.. 快接Ajax。。映射动态请求 -->
    <mvc:annotation-driven />
    <!--  将springmvc不能处理的资源交给tomcat  -->
    <mvc:default-servlet-handler/>

</beans>
web.xml
<?xml version="1.0" encoding="UTF-8"?>
<web-app xmlns:xsi="http://www.w3.org/2001/XMLSchema-instance"
   xmlns="http://java.sun.com/xml/ns/javaee"
   xsi:schemaLocation="http://java.sun.com/xml/ns/javaee http://java.sun.com/xml/ns/javaee/web-app_3_0.xsd"
   id="WebApp_ID" version="3.0">


   <!-- 1.启动spring容器 -->
   <context-param>
      <param-name>contextConfigLocation</param-name>
      <param-value>classpath:applicationContext.xml</param-value>
   </context-param>

   <listener>
      <listener-class>org.springframework.web.context.ContextLoaderListener</listener-class>
   </listener>

   <!-- 2.springmvc前端控制器 , 拦截所有请求 -->
   <servlet>
      <servlet-name>dispatcherServlet</servlet-name>
      <servlet-class>org.springframework.web.servlet.DispatcherServlet</servlet-class>
      <init-param>
         <param-name>contextConfigLocation</param-name>
         <param-value>classpath:applicationContext-mvc.xml</param-value>
       </init-param>
      <load-on-startup>1</load-on-startup>
   </servlet>

   <servlet-mapping>
      <servlet-name>dispatcherServlet</servlet-name>
      <url-pattern>/</url-pattern>
   </servlet-mapping>

   <!-- 3.字符编码过滤器(最先) -->
   <filter>
      <filter-name>CharacterEncodingFilter</filter-name>
      <filter-class>org.springframework.web.filter.CharacterEncodingFilter</filter-class>
      <init-param>
         <param-name>encoding</param-name>
         <param-value>utf-8</param-value>
      </init-param>
      <init-param>
         <param-name>forceRequestEncoding</param-name>
         <param-value>true</param-value>
      </init-param>
      <init-param>
         <param-name>forceResponseEncoding</param-name>
         <param-value>true</param-value>
      </init-param>
   </filter>

   <filter-mapping>
      <filter-name>CharacterEncodingFilter</filter-name>
      <url-pattern>/*</url-pattern>
   </filter-mapping>

   <!-- 4.配置跨域  -->
   <filter>
       <description>跨域过滤器</description>
       <filter-name>CORS</filter-name>
       <filter-class>com.thetransactioncompany.cors.CORSFilter</filter-class>
       <init-param>
        <param-name>cors.allowOrigin</param-name>
           <param-value>*</param-value>
       </init-param>
       <init-param>
        <param-name>cors.supportedMethods</param-name>
           <param-value>GET, POST, HEAD, PUT, DELETE</param-value>
       </init-param>
       <init-param>
        <param-name>cors.supportedHeaders</param-name>
           <param-value>Accept, Origin, X-Requested-With, Content-Type, Last-Modified</param-value>
       </init-param>
       <init-param>
           <param-name>cors.exposedHeaders</param-name>
           <param-value>Set-Cookie</param-value>
       </init-param>
       <init-param>
           <param-name>cors.supportsCredentials</param-name>
           <param-value>true</param-value>
       </init-param>
    </filter>

    <filter-mapping>
        <filter-name>CORS</filter-name>
        <url-pattern>/*</url-pattern>
    </filter-mapping>

   <!-- 5.配置druid连接池 -->
   <!-- 经常需要排除一些不必要的url,比如.js,/jslib/等等。配置在init-param中。比如 -->
   <filter>
      <filter-name>DruidWebStatFilter</filter-name>
      <filter-class>com.alibaba.druid.support.http.WebStatFilter</filter-class>
      <init-param>
         <param-name>exclusions</param-name>
         <param-value>*.js,*.gif,*.jpg,*.png,*.css,*.ico,/druid/*</param-value>
      </init-param>
   </filter>

   <filter-mapping>
      <filter-name>DruidWebStatFilter</filter-name>
      <url-pattern>/*</url-pattern>
   </filter-mapping>

   <!-- druid的Servlet -->
   <servlet>
      <servlet-name>DruidStatView</servlet-name>
      <servlet-class>com.alibaba.druid.support.http.StatViewServlet</servlet-class>
   </servlet>

   <servlet-mapping>
      <servlet-name>DruidStatView</servlet-name>
      <url-pattern>/druid/*</url-pattern>
   </servlet-mapping>


   <!-- 6.使用Rest风格 ,可以封装put请求的数据 可以直接使用put-->
   <filter>
      <filter-name>HttpPutFormContentFilter</filter-name>
      <filter-class>org.springframework.web.filter.HttpPutFormContentFilter</filter-class>
   </filter>

   <filter-mapping>
      <filter-name>HttpPutFormContentFilter</filter-name>
      <url-pattern>/*</url-pattern>
   </filter-mapping>

</web-app>
本文标题:【Spring】SSM整合(附完整代码)
本文链接:https://blog.quwenai.cn/post/9796.html
版权声明:本文不使用任何协议授权,您可以任何形式自由转载或使用。

")
:如何实现一个插件")
:插件实现逻辑分析")
还没有评论,来说两句吧...