
SpringMVC 大致可以分成两个阶段,初始化阶段和运行阶段
- 初始化阶段:负责初始化 IOC 容器及九大基本组件
- 运行阶段:负责处理用户请求返回处理结果
运行时序图如下(只列出了核心类和方法):
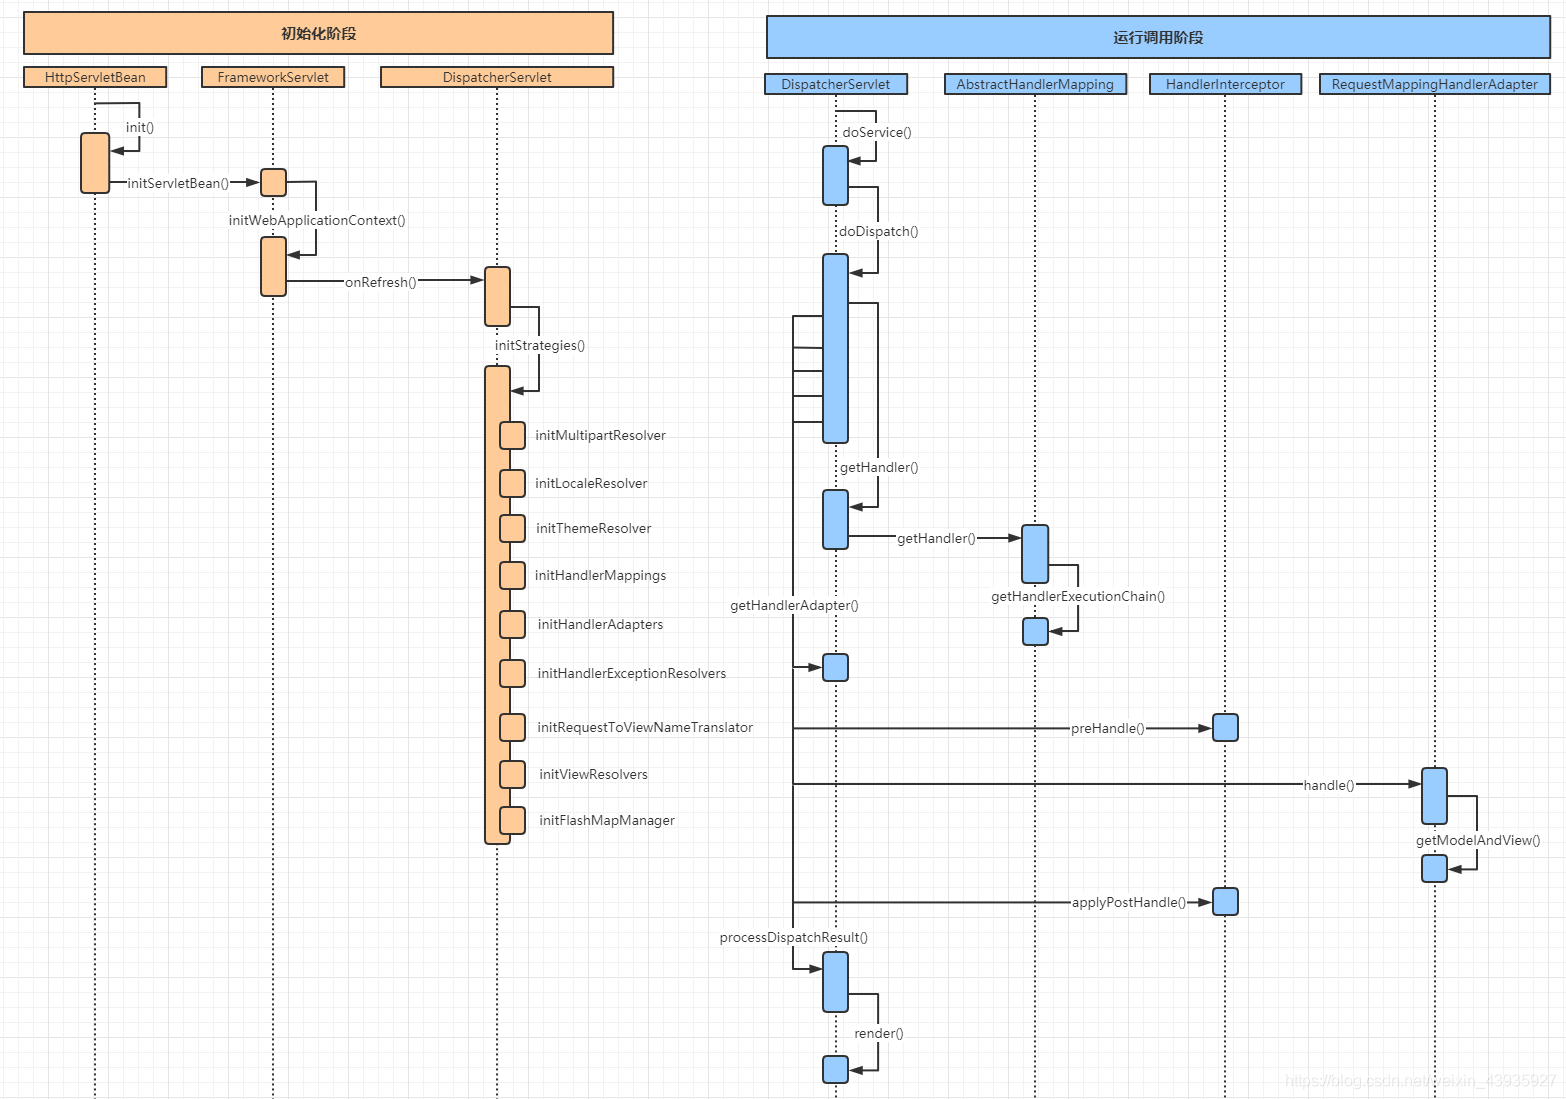
从这两个阶段中我们提炼出最重要的三步:
- ApplicationContext 初始化时用 Map 保存所有 url 和 Controller 类的对应关系
- 根据请求 url 找到对应的Controller,并从 Controller 中找到处理请求的方法
- Request参数绑定到方法的形参,执行方法处理请求,并返回结果视图
下面进入正文,我们的思路是首先找到 DispatcherServlet 这个类,然后寻找init()方法。我们发现其 init 方法其实在父类 HttpServletBean中,源码如下:
init()
@Override
public final void init() throws ServletException {
   if (logger.isDebugEnabled()) {
      logger.debug("Initializing servlet '" + getServletName() + "'");
   }

   // Set bean properties from init parameters.
   PropertyValues pvs = new ServletConfigPropertyValues(getServletConfig(), this.requiredProperties);
   if (!pvs.isEmpty()) {
      try {
         // 定位资源
         BeanWrapper bw = PropertyAccessorFactory.forBeanPropertyAccess(this);
         // 加载配置信息
         ResourceLoader resourceLoader = new ServletContextResourceLoader(getServletContext());
         bw.registerCustomEditor(Resource.class, new ResourceEditor(resourceLoader, getEnvironment()));
         initBeanWrapper(bw);
         bw.setPropertyValues(pvs, true);
      }
      catch (BeansException ex) {
         if (logger.isErrorEnabled()) {
            logger.error("Failed to set bean properties on servlet '" + getServletName() + "'", ex);
         }
         throw ex;
      }
   }

   // Let subclasses do whatever initialization they like.
   // 让子类进行初始化
   initServletBean();

   if (logger.isDebugEnabled()) {
      logger.debug("Servlet '" + getServletName() + "' configured successfully");
   }
}
我们看到在这段代码中,又调用了一个重要的 initServletBean() 方法。进入 initServletBean() 方法看到以下源码:
initServletBean()
@Override
protected final void initServletBean() throws ServletException {
   getServletContext().log("Initializing Spring FrameworkServlet '" + getServletName() + "'");
   if (this.logger.isInfoEnabled()) {
      this.logger.info("FrameworkServlet '" + getServletName() + "': initialization started");
   }
   long startTime = System.currentTimeMillis();

   try {
	  // 初始化IOC容器
      this.webApplicationContext = initWebApplicationContext();
      initFrameworkServlet();
   }
   catch (ServletException ex) {
      this.logger.error("Context initialization failed", ex);
      throw ex;
   }
   catch (RuntimeException ex) {
      this.logger.error("Context initialization failed", ex);
      throw ex;
   }

   if (this.logger.isInfoEnabled()) {
      long elapsedTime = System.currentTimeMillis() - startTime;
      this.logger.info("FrameworkServlet '" + getServletName() + "': initialization completed in " +
            elapsedTime + " ms");
   }
}
initWebApplicationContext()
IOC 容器初始化之后,最后又调用了 onRefresh() 方法。这个方法最终是在 DisptcherServlet 中实现,来看源码:
protected WebApplicationContext initWebApplicationContext() {

   // 先从ServletContext中获得父容器 WebAppliationContext
   WebApplicationContext rootContext =
         WebApplicationContextUtils.getWebApplicationContext(getServletContext());
   // 声明子容器
   WebApplicationContext wac = null;

   // 建立父、子容器之间的关联关系
   if (this.webApplicationContext != null) {
      // A context instance was injected at construction time -> use it
      wac = this.webApplicationContext;
      if (wac instanceof ConfigurableWebApplicationContext) {
         ConfigurableWebApplicationContext cwac = (ConfigurableWebApplicationContext) wac;
         if (!cwac.isActive()) {
            // The context has not yet been refreshed -> provide services such as
            // setting the parent context, setting the application context id, etc
            // 上下文尚未刷新,提供诸如设置父上下文,设置应用上下文,id等
            if (cwac.getParent() == null) {
               // The context instance was injected without an explicit parent -> set
               // the root application context (if any; may be null) as the parent
               cwac.setParent(rootContext);
            }
            // 这个方法里面调用了AbatractApplication的 refresh()模板方法,规定IOC初始化基本流程
            configureAndRefreshWebApplicationContext(cwac);
         }
      }
   }
   // 先去ServletContext中查找Web容器的引用是否存在,并创建好默认的空IOC容器
   if (wac == null) {
      // No context instance was injected at construction time -> see if one
      // has been registered in the servlet context. If one exists, it is assumed
      // that the parent context (if any) has already been set and that the
      // user has performed any initialization such as setting the context id
      wac = findWebApplicationContext();
   }
   // 给上一步创建好的IOC容器赋值
   if (wac == null) {
      // No context instance is defined for this servlet -> create a local one
      wac = createWebApplicationContext(rootContext);
   }

   // 触发onRefresh方法
   if (!this.refreshEventReceived) {
      // Either the context is not a ConfigurableApplicationContext with refresh
      // support or the context injected at construction time had already been
      // refreshed -> trigger initial onRefresh manually here.
      onRefresh(wac);
   }

   if (this.publishContext) {
      // Publish the context as a servlet context attribute.
      String attrName = getServletContextAttributeName();
      getServletContext().setAttribute(attrName, wac);
      if (this.logger.isDebugEnabled()) {
         this.logger.debug("Published WebApplicationContext of servlet '" + getServletName() +
               "' as ServletContext attribute with name [" + attrName + "]");
      }
   }

   return wac;
}
这段代码中最主要的逻辑就是初始化IOC容器,最终会调用 refresh() 方法。
关于IOC容器的初始化细节可以参考:
另外,这里还涉及了 Spring 容器与 SpringMVC 容器的关系:
-
相同:Spring 容器与 SpringMVC 容器都是 IOC 容器实例,都是走 refresh 流程创建的
-
不同:Spring 容器是 SpringMVC 容器的父容器(
cwac.setParent(parent)),会先于 SpringMVC 容器创建。所以 SpringMVC 容器能获取到 Spring 容器的 bean,而 Spring 容器获取不到 SpringMVC 容器的 bean -
总结:我们在平时开发中,一般会使用两个配置文件去明确这两个容器注册不同的 bean
- applicationContext.xml:配置 Spring 容器,去管理那些通用 bean(service,dao等)
- applicationContext-mvc.xml:配置 SpringMVC 容器,专门管理 controller
注意:在应用中会创建几个 IOC 容器并不是由 xml 文件个数决定,而是走了实际走了几遍 refresh。
两个容器对应在 web.xml 的配置也不同:
<!-- 1.启动spring容器 -->
<context-param>
   <param-name>contextConfigLocation</param-name>
   <param-value>classpath:applicationContext.xml</param-value>
</context-param>

<listener>
   <listener-class>org.springframework.web.context.ContextLoaderListener</listener-class>
</listener>

<!-- 2.springmvc前端控制器 , 拦截所有请求 -->
<servlet>
   <servlet-name>dispatcherServlet</servlet-name>
   <servlet-class>org.springframework.web.servlet.DispatcherServlet</servlet-class>
   <init-param>
       <param-name>contextConfigLocation</param-name>
       <param-value>classpath:applicationContext-mvc.xml</param-value>
   </init-param>
   <load-on-startup>1</load-on-startup>
</servlet>

<servlet-mapping>
   <servlet-name>dispatcherServlet</servlet-name>
   <url-pattern>/</url-pattern>
</servlet-mapping>
关于 Spring 容器与 SpringMVC 容器的关系再放几个参考链接, 参考链接1,参考链接2,参考链接3,参考链接4…
onRefresh()
@Override
protected void onRefresh(ApplicationContext context) {
   initStrategies(context);
}

// 初始化策略
protected void initStrategies(ApplicationContext context) {
   // 多文件上传的组件
   initMultipartResolver(context);
   // 初始化本地语言环境
   initLocaleResolver(context);
   // 初始化模板处理器
   initThemeResolver(context);
   // handlerMapping
   initHandlerMappings(context);
   // 初始化参数适配器
   initHandlerAdapters(context);
   // 初始化异常拦截器
   initHandlerExceptionResolvers(context);
   // 初始化视图预处理器
   initRequestToViewNameTranslator(context);
   // 初始化视图转换器
   initViewResolvers(context);
   //
   initFlashMapManager(context);
}
到这一步就完成了SpringMVC的九大组件的初始化。
接下来, 我们来看 url 和 Controller 的关系是如何建立的。HandlerMapping 的子类 AbstractDetectingUrlHandlerMapping 实现了 initApplicationContext() 方法,所以我们直接看子类中的初始化容器方法
initApplicationContext()
public void initApplicationContext() throws ApplicationContextException {
   super.initApplicationContext();
   detectHandlers();
}

// 建立当前ApplicationContext中的所有controller和url的对应关系
protected void detectHandlers() throws BeansException {
   ApplicationContext applicationContext = obtainApplicationContext();
   if (logger.isDebugEnabled()) {
      logger.debug("Looking for URL mappings in application context: " + applicationContext);
   }
   // 获取ApplicationContext容器中所有bean的Name
   String[] beanNames = (this.detectHandlersInAncestorContexts ?
         BeanFactoryUtils.beanNamesForTypeIncludingAncestors(applicationContext, Object.class) :
         applicationContext.getBeanNamesForType(Object.class));

   // Take any bean name that we can determine URLs for.
   // 遍历beanNames,并找到这些bean对应的url
   for (String beanName : beanNames) {
      // 找bean上的所有url(controller上的url+方法上的url),该方法由对应的子类实现
      String[] urls = determineUrlsForHandler(beanName);
      if (!ObjectUtils.isEmpty(urls)) {
         // URL paths found: Let's consider it a handler.
         // 保存urls和beanName的对应关系,put it to Map<urls,beanName>,该方法在父类AbstractUrlHandlerMapping中实现
         registerHandler(urls, beanName);
      }
      else {
         if (logger.isDebugEnabled()) {
            logger.debug("Rejected bean name '" + beanName + "': no URL paths identified");
         }
      }
   }
}

// 获取controller中所有方法的url,由子类实现,典型的模板模式
protected abstract String[] determineUrlsForHandler(String beanName);
determineUrlsForHandler(String beanName)方法的作用是获取每个Controller 中的 url,不同的子类有不同的实现,这是一个典型的模板设计模式。
因为开发中我们用的最多的就是用注解来配置 Controller 中的 url, BeanNameUrlHandlerMapping 是 AbstractDetectingUrlHandlerMapping 的子类,用于处理注解形式的url映射。所以我们这里以 BeanNameUrlHandlerMapping 来进行分析。
determineUrlsForHandler()
// 获取Controller中所有url
@Override
protected String[] determineUrlsForHandler(String beanName) {
   List<String> urls = new ArrayList<>();
   if (beanName.startsWith("/")) {
      urls.add(beanName);
   }
   String[] aliases = obtainApplicationContext().getAliases(beanName);
   for (String alias : aliases) {
      if (alias.startsWith("/")) {
         urls.add(alias);
      }
   }
   return StringUtils.toStringArray(urls);
}
到这里 HandlerMapping 组件就已经建立所有 url 和 Controller 的对应关系。
运行阶段分析见 【Spring】MVC:源码分析(下)运行阶段…
:Tomcat 打破双亲委派")


还没有评论,来说两句吧...