
本文中将介绍maven的自定义插件(入门实战)自定义archeType模板(实战)按环境打包(实战)三个在私服中常常需用的操作。
1. 自定义archeType模板的创建
1.1 什么是archeType
我们在创建maven项目的时候,你会发现有这么多的apache提供的模板。
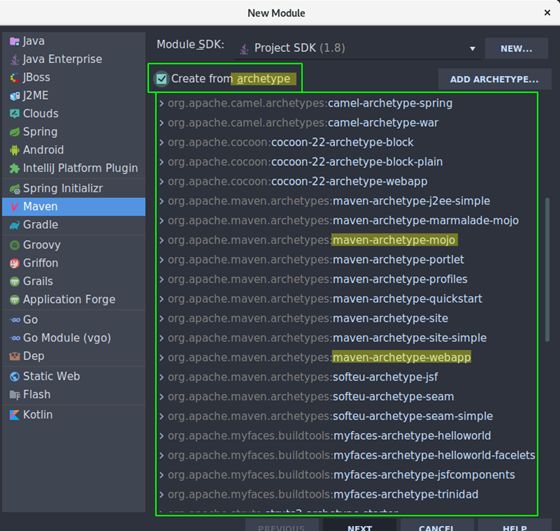
或者使用mvn archetype:generate命令来快速创建maven项目,也会有很多个选项,让你选择模板序号。那每个模板之间有什么区别呢?
每个模板里其实就是附带不同的依赖和插件。一般在公司私服里都会有属于本公司的一套archeType模板,里面有着调试好的项目用到的依赖包和版本号。
1.2.创建archetype
假如自己已经有了一个maven项目,想给该项目创建一个archeType模板。
cd 到项目根目录下执行(pom.xml同级目录)。
mvnarchetype:create-from-project
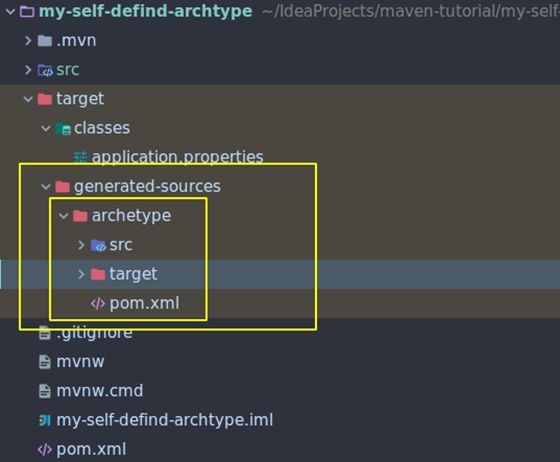
此时会在项目target下生成这些文件:
1.3. 生成archetype模板
先 cdtarget/generated-sources/archetype/
然后执行 mvn install
执行成功后,执行crawl命令,在本地仓库的根目录生成archetype-catalog.xml骨架配置文件:
mvnarchetype:crawl
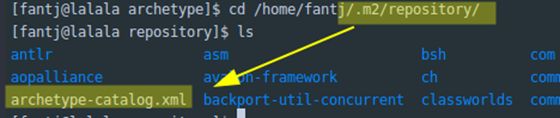
来看一看它里面的内容:
[fantj@lalalarepository]$ cat archetype-catalog.xml

<archetype-catalogxsi:schemaLocation="http://maven.apache.org/plugins/maven-archetype-plugin/archetype-catalog/1.0.0http://maven.apache.org/xsd/archetype-catalog-1.0.0.xsd"
   xmlns="http://maven.apache.org/plugins/maven-archetype-plugin/archetype-catalog/1.0.0"
   xmlns:xsi="http://www.w3.org/2001/XMLSchema-instance">
 <archetypes>
   <archetype>
     <groupId>com.fantjgroupId>
     <artifactId>my-self-defind-archtype-archetypeartifactId>
     <version>0.0.1-SNAPSHOTversion>
     <description>my-self-defind-archtypedescription>
   archetype>
 archetypes>
archetype-catalog>
1.4. 使用archetype模板
执行mvn archetype:generate -DarchetypeCatalog=local从本地archeType模板中创建项目。
mvn archetype:generate-DarchetypeCatalog=local
然后会让你选择模板序号和groupIdartifactIdversion和package信息:
Choose archetype:
1: local ->com.fantj:my-self-defind-archtype-archetype (my-self-defind-archtype)
Choose a number or apply filter (format: [groupId:]artifactId,case sensitive contains): : 1
Define value for property 'groupId': com.fantj
Define value for property 'artifactId':my-self-defind-archetype-test
Define value for property 'version' 1.0-SNAPSHOT: :
Define value for property 'package' com.fantj: :
Confirm properties configuration:
groupId: com.fantj
artifactId: my-self-defind-archetype-test
version: 1.0-SNAPSHOT
package: com.fantj
 Y: : y
[INFO]----------------------------------------------------------------------------
[INFO] Using following parameters for creating projectfrom Archetype: my-self-defind-archtype-archetype:0.0.1-SNAPSHOT
[INFO]----------------------------------------------------------------------------
[INFO] Parameter: groupId, Value: com.fantj
[INFO] Parameter: artifactId, Value:my-self-defind-archetype-test
[INFO] Parameter: version, Value: 1.0-SNAPSHOT
[INFO] Parameter: package, Value: com.fantj
[INFO] Parameter: packageInPathFormat, Value:com/fantj
[INFO] Parameter: package, Value: com.fantj
[INFO] Parameter: version, Value: 1.0-SNAPSHOT
[INFO] Parameter: groupId, Value: com.fantj
[INFO] Parameter: artifactId, Value:my-self-defind-archetype-test
[INFO] Project created from Archetype in dir:/home/fantj/IdeaProjects/maven-tutorial/my-self-defind-archetype-test
[INFO]------------------------------------------------------------------------
[INFO] BUILD SUCCESS
项目创建成功!
当然,也可以使用IDEA来帮我们用图形界面使用archeType模板创建项目:

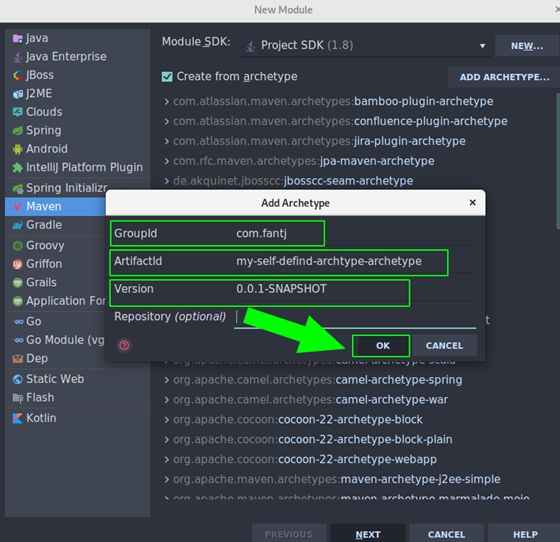
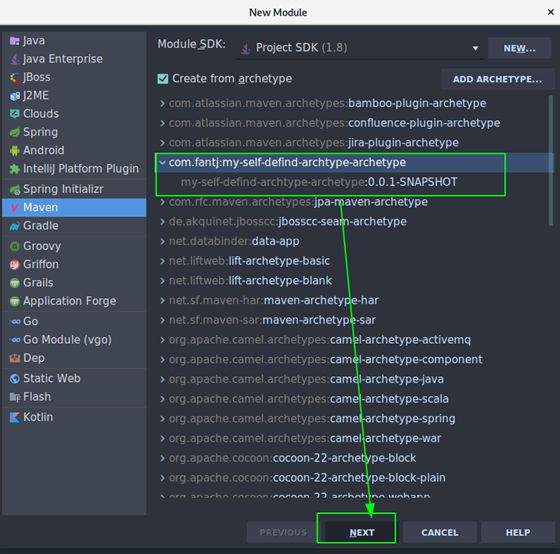
后面的就与创建普通项目相同了,不做演示。
2. 自定义插件
在这里我只是做了简单的示例,更复杂的功能开发请参考mojo的API:
https://maven.apache.org/developers/mojo-api-specification.html
2.1.插件提供者
插件提供者项目结构
├── pom.xml
├── src
│ └── main
│ ├── java
│ │ └── com
│ │ └── fantj
│ │ └── mypluginprovide
│ │ └── MyMojo.java
│ └── resources
│ └──application.properties
└── target
│
└──my-plugin-provide-0.0.1-SNAPSHOT.jar
2.1.1 修改packaging
<packaging>maven-pluginpackaging>
2.1.2. 修改pom
<dependency>
   <groupId>org.apache.mavengroupId>
   <artifactId>maven-plugin-apiartifactId>
   <version>3.5.0version>
dependency>
<dependency>
   <groupId>org.apache.maven.plugin-toolsgroupId>
   <artifactId>maven-plugin-annotationsartifactId>
   <version>3.5version>
dependency>
这两个依赖是自定义插件必须的依赖,代表了它是一个Mojo工程,里面包含了一些Mojo的接口和抽象类以及注解。
2.1.3 coding业务逻辑
@Mojo(name ="fantj",defaultPhase = LifecyclePhase.PACKAGE)
public class MyMojo extends AbstractMojo {

    @Parameter
    privateString msg;

    @Parameter
    privateList list;

    public voidexecute() throws MojoExecutionException, MojoFailureException {
       System.out.println("hello plugin: "+msg + "list: "+list);
    }
}
注意这里面的@Parameter@MojoLifecyclePhase.PACKAGE都是org.apache.maven.plugins.annotations包下的:
importorg.apache.maven.plugins.annotations.LifecyclePhase;
import org.apache.maven.plugins.annotations.Mojo;
import org.apache.maven.plugins.annotations.Parameter;
@Parameter注解会获取消费者配置文件中的变量值并赋值。
defaultPhase =LifecyclePhase.PACKAGE声明了该插件触发的生命周期。
@Mojo定义插件的goal名字。
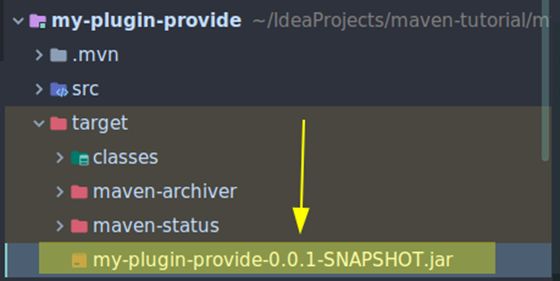
2.1.4 clean and install
执行mvn clean install,在target目录下会生成这样一个jar包,这就是插件包。
2.2.插件消费者
插件消费者 : 项目结构
├── pom.xml
└── src
└── main
├── java
│ └── com
│ └── fantj
│ └── mypluginuse
└──resources
└──application.properties
2.2.1 修改pom
<projectxmlns="http://maven.apache.org/POM/4.0.0"xmlns:xsi="http://www.w3.org/2001/XMLSchema-instance"
        xsi:schemaLocation="http://maven.apache.org/POM/4.0.0http://maven.apache.org/xsd/maven-4.0.0.xsd">
   <modelVersion>4.0.0modelVersion>

   <groupId>com.fantjgroupId>
   <artifactId>my-plugin-consumeartifactId>
   <version>0.0.1-SNAPSHOTversion>

   <build>
       <plugins>
           <plugin>
               <groupId>com.fantjgroupId>
               <artifactId>my-plugin-provideartifactId>
               <version>0.0.1-SNAPSHOTversion>
               <configuration>
                   <msg>hello pluginmsg>
                   <list>
                       <list>onelist>
                       <list>twolist>
                   list>
               configuration>

                              <executions>
                   <execution>
                       <phase>packagephase>
                       <goals>
                           <goal>fantjgoal>
                       goals>
                   execution>
               executions>
           plugin>
       plugins>
   build>
project>
如果不加
2.2.2如何传递参数给plugin
在插件提供者中,有个MyMojo的类,有这样一段代码:
    @Parameter
    privateString msg;

    @Parameter
    privateList list;
它和你用过的spring注解一样,也是用来以注解的形式获取参数的值。
相对应的,在插件消费者的配置中我们就应该相应的给出参数的定义:
<configuration>
   <msg>hello pluginmsg>
    <list>
        <list>onelist>
        <list>twolist>
   list>
configuration>
上面的配置与变量名一一对应即可。这时候你会发现maven插件中自动会添加一个plugins选项:
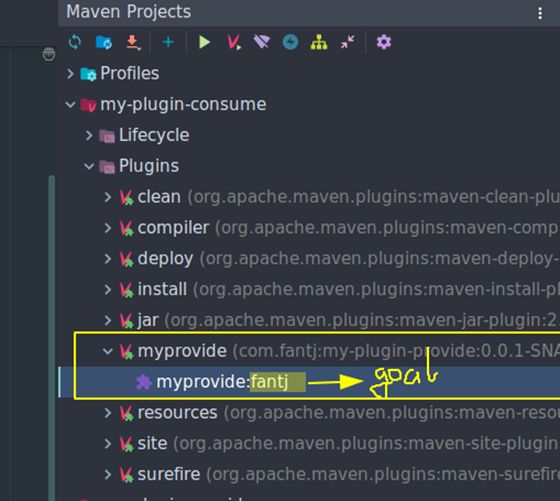
执行该插件:mvnmyprovide:fantj 或者直接点击
[fantj@lalalamy-plugin-consume]$ mvn myprovide:fantj
[INFO] Scanning for projects...
[INFO]
[INFO] -----------------------------------------
[INFO] Building my-plugin-consume 0.0.1-SNAPSHOT
[INFO] --------------------------------[ jar]---------------------------------
[INFO]
[INFO] --- my-plugin-provide:0.0.1-SNAPSHOT:fantj(default-cli) @ my-plugin-consume ---
hello plugin: hello pluginlist: [one, two]
[INFO] ------------------------------------------------------------------------
[INFO] BUILD SUCCESS
[INFO]------------------------------------------------------------------------
[INFO] Total time: 0.347 s
[INFO] Finished at: 2018-11-01T19:59:04+08:00
[INFO] ------------------------------------------------------------------------
3.Profile按环境打包
在日常开发中,我们项目的开发环境和生产环境以及测试环境往往是不同的,比如:数据库的url等。在项目上生产环境时,就需要修改这些参数,给开发造成不便。为了解决该问题,Maven 2.0引入了构建配置文件的概念(build profiles)。
它能干什么呢?
假如你的生产环境和开发环境所需环境配置不同,生产环境配置文件是pro.properties,开发环境配置文件是dev.properties,那么用maven profile ,你可以实现打包开发环境jar包的时候只将dev.properties打包并使用,生产环境打包同理。
在哪里声明呢?
它可以在每个项目的pom.xml文件中声明,也可以在maven的用户setting.xml下声明,也可以在maven全局环境下设置setting.xml,详情如下。
1.Per Project
Defined in the POM itself (pom.xml).
2.Per User
Defined in the Maven-settings(%USER_HOME%/.m2/settings.xml)
3.Global
Defined in the globalMaven-settings (${maven.home}/conf/settings.xml)
4.Profile descriptor
不支持3.0,详情请看:
https://cwiki.apache.org/MAVEN/maven-3x-compatibility-notes.html#Maven3.xCompatibilityNotes-profiles.xml
虽然有这么多define的方式,但是我们一般使用的是第一种defined in the pom,因为不见得每个项目的生产环境都一模一样,当然这个也是因个人情况而异。
实战
3.1. 项目结构
├── pom.xml
├── src
│ ├── main
│ │ ├── java
│ │ │ └── com
│ │ │ └── fantj
│ │ └── resources
│ │ └── conf
│ │ ├── dev
│ │ │ └── application.properties
│ │ ├── pro
│ │ │ └── application.properties
│ │ └── test
│ │ └── application.properties
│ └── test
│ └── java
3.2. pom.xml
    <profiles>
       <profile>
           <id>devid>
           <properties>
               <profile.env>devprofile.env>
           properties>
           <activation>
               <activeByDefault>devactiveByDefault>
           activation>
       profile>
       <profile>
           <id>proid>
           <properties>
               <profile.env>proprofile.env>
           properties>
       profile>
       <profile>
           <id>testid>
           <properties>
               <profile.env>testprofile.env>
           properties>
       profile>
    profiles>

   <build>
       <resources>
           <resource>
               <directory>${basedir}/src/main/resourcesdirectory>
               <excludes>
                   <exclude>conf/**exclude>
               excludes>
           resource>
           <resource>
               <directory>src/main/resources/conf/${profile.env}directory>
           resource>
       resources>
   build>
3.3 三个application.properties
dev/application.properties

env=dev
db.url=192.168.0.166
db.username=db-dev
db.password=db-dev

pro/application.properties

env=pro
db.url=47.xxx.xxx.xxx
db.username=db-pro
db.password=db-pro

test/application.properties

env=test
db.url=127.0.0.1
db.username=db-test
db.password=db-test
3.4 打包
mvn clean install-P pro
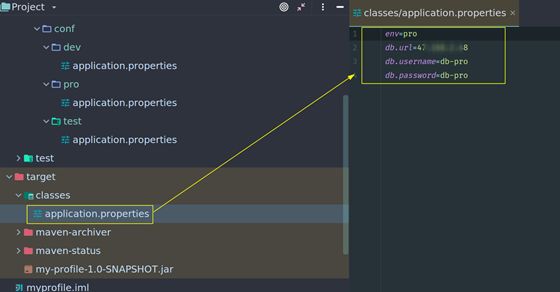
可以看到只将pro/application.properties进行了编译。
本教程中的项目源码:
https://github.com/fantj/maven-tutorial
:Tomcat 打破双亲委派")


还没有评论,来说两句吧...