
前言
spring boot有着丰富的特性,其中的自动配置特性以及条件装配极大的简化了程序开发中的工作(不用写一行XML)。本文我们就来看一下spring boot是如何做到自动配置的。
在开始分析之前,直接编写一个测试案例来体验下在开发项目中我们可以如何实现自己的自定义配置(直接上代码感受 (Talk is cheap,Show me the code)
自定义配置的properties 类
import lombok.Data;
import org.springframework.beans.factory.annotation.Value;
import org.springframework.boot.context.properties.ConfigurationProperties;

import java.nio.charset.StandardCharsets;
@Data
@ConfigurationProperties(prefix = "my.service")
//必须要有@EnableConfigurationProperties使用此类,否则idea飘红
public class MyProperties {

    private static final String DEFAULT_NAME = "default name";

    private static final String DEFAULT_MSG = "default msg";

    private String name = DEFAULT_NAME;

    private String msg = DEFAULT_MSG;

    public void setName(@Value("${my.service.name}") String name) {
        //解决配置文件中文乱码问题
        this.name = new String(name.getBytes(StandardCharsets.ISO_8859_1), StandardCharsets.UTF_8);
    }

    public void setMsg(@Value("${my.service.msg}") String msg) {
        this.msg = new String(msg.getBytes(StandardCharsets.ISO_8859_1), StandardCharsets.UTF_8);
    }
服务类(根据适合场景调整业务)
import lombok.Data;

@Data
public class MyService {

    private String type;

    private String msg;

    private String name;

    public String sayHello() {
        System.out.println(String.format("my service %s say %s!",name,msg));
        return name + " say " + msg + " !";
    }
}
自动装配类
import com.autoConfiguration.properties.MyProperties;
import com.autoConfiguration.service.MyService;
import org.springframework.beans.factory.annotation.Autowired;
import org.springframework.boot.context.properties.EnableConfigurationProperties;
import org.springframework.context.annotation.Bean;
import org.springframework.context.annotation.Configuration;

/**
 * 服务Bean对象注册
 */
@Configuration
@EnableConfigurationProperties(MyProperties.class)
public class MyServiceAutoConfiguration {

    @Autowired
    MyProperties myProperties;
    /**
     * 创建一个bean,一般其他依赖此jar包的项目可以直接使用
     */
    @Bean("MyAutoConfigService")
    MyService myService() {
        MyService myService = new MyService();
        myService.setName(myProperties.getName());
        myService.setMsg(myProperties.getMsg());
        return myService;
    }

}
简单的看下@EnableConfigurationProperties 的有关的类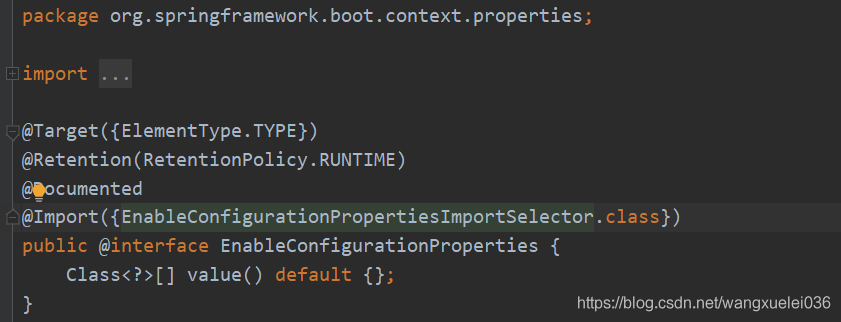
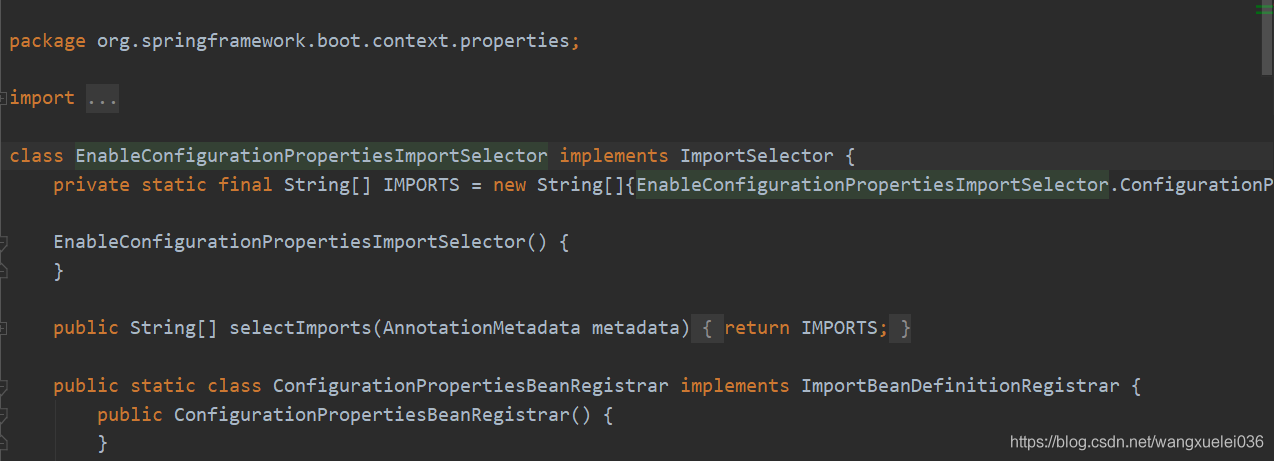
这里可以看出,自动装配 肯定和 @Import 注解 以及* ImportSelector 处理类有关系(还有其他的实现方式)
这个就留在后面深入分析的时候具体讲解
继续往下
注意!!! 开始划重点*
需要自己在META-INF手动创建 spring.factories 文件中创建一个文件 并将你自己需要的自动装配类的路劲写入,否则spring启动加载不会加载该装配类 (可以查看下其他自动装配的jar包,也存在该文件)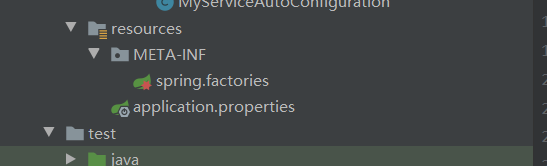
写入相应的自动装配类信息
org.springframework.boot.autoconfigure.EnableAutoConfiguration=com.autoConfiguration.configuration.MyServiceAutoConfiguration
到这,自己实现的自动装配类已经大功告成,接下来我们只需要来检测下 是否 能实现 引入即可用
创建第二个项目,并加入相应的依赖 (重点是自己实现的jar的依赖)
	<dependencies>
        <dependency>
            <groupId>com.test</groupId>
            <artifactId>autoConfig</artifactId>
            <version>1.0-SNAPSHOT</version>
        </dependency>
    </dependencies>
编写启动类
import com.autoConfiguration.service.MyService;
import org.springframework.boot.WebApplicationType;
import org.springframework.boot.autoconfigure.SpringBootApplication;
import org.springframework.boot.builder.SpringApplicationBuilder;
import org.springframework.context.ConfigurableApplicationContext;

//@EnableAutoConfiguration
@SpringBootApplication
public class MyServiceAutoConfigurationApplication {

    public static void main(String[] args) {
        ConfigurableApplicationContext context = new SpringApplicationBuilder(MyServiceAutoConfigurationApplication.class)
                .web(WebApplicationType.NONE)
                .run(args);

        MyService myAutoConfigService = context.getBean("MyAutoConfigService", MyService.class);
        myAutoConfigService.sayHello();
        context.close();
    }
}
极(测)品(试)装(结)备(果),点击就送
以下就是我们的实际效果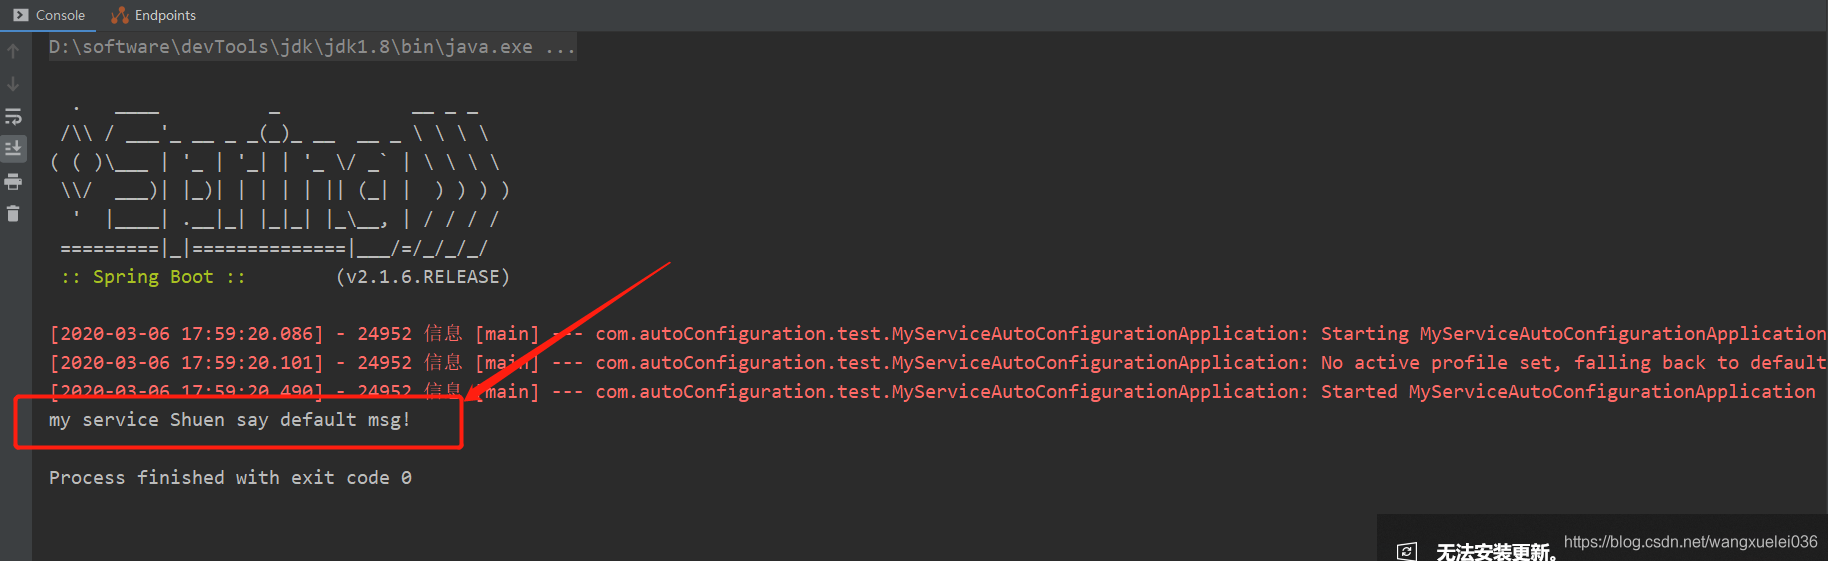
体验条件装配
接下来继续体验条件装配,顾名思义,所谓条件装配 就是根据一些标识(为什么说标识,因为在代码世界你可以将所有信息都看作标识,条件也就是一个标识) 来判断你的代码逻辑,当然我们用起来简单,但是实现其实很复杂,还是非常感谢那些写框架的大佬们,我们也一起加油努力,站在他们的肩膀上,继续追赶他们。
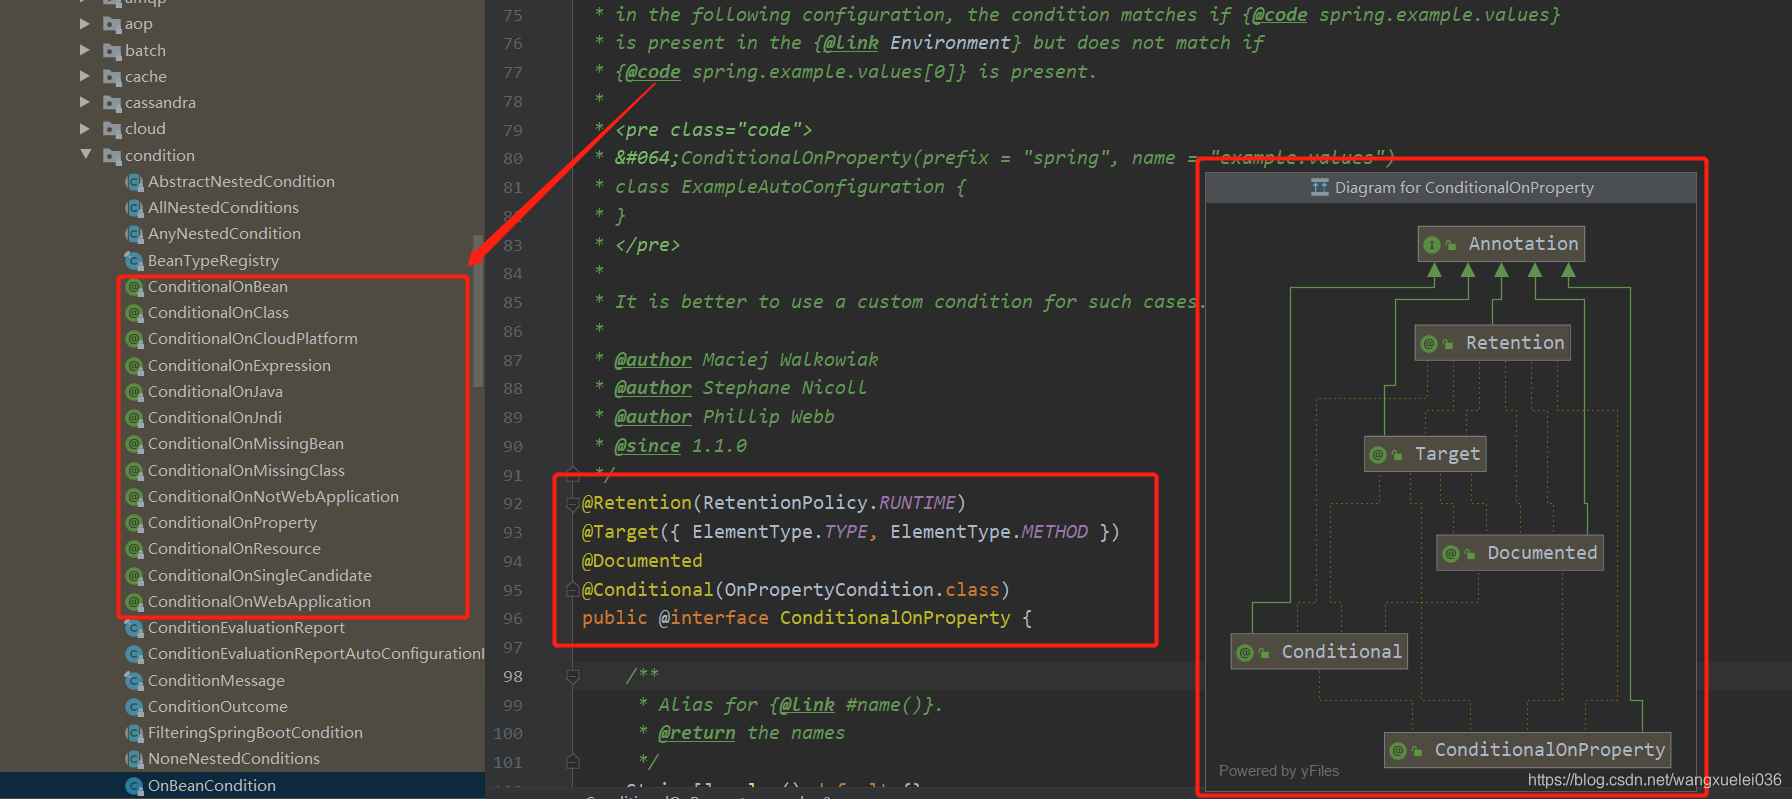
先看看springboot 给我们提供了哪些条件装配的方式
左边就是所有提供的 条件装配的注解类
右边两个可以看出注解类的派生关系,
@Conditional
conditional中文的意思为条件,其本身是Springframework提供的核心注解,通常情况下该注解可以加在类上或者方法上与@Configuration或者@Bean配合使用,当和@Configuration配合使用时,那么该类下所有@Bean方法 或者@Import 或者 @ComponentScan都会受到其配置条件的影响
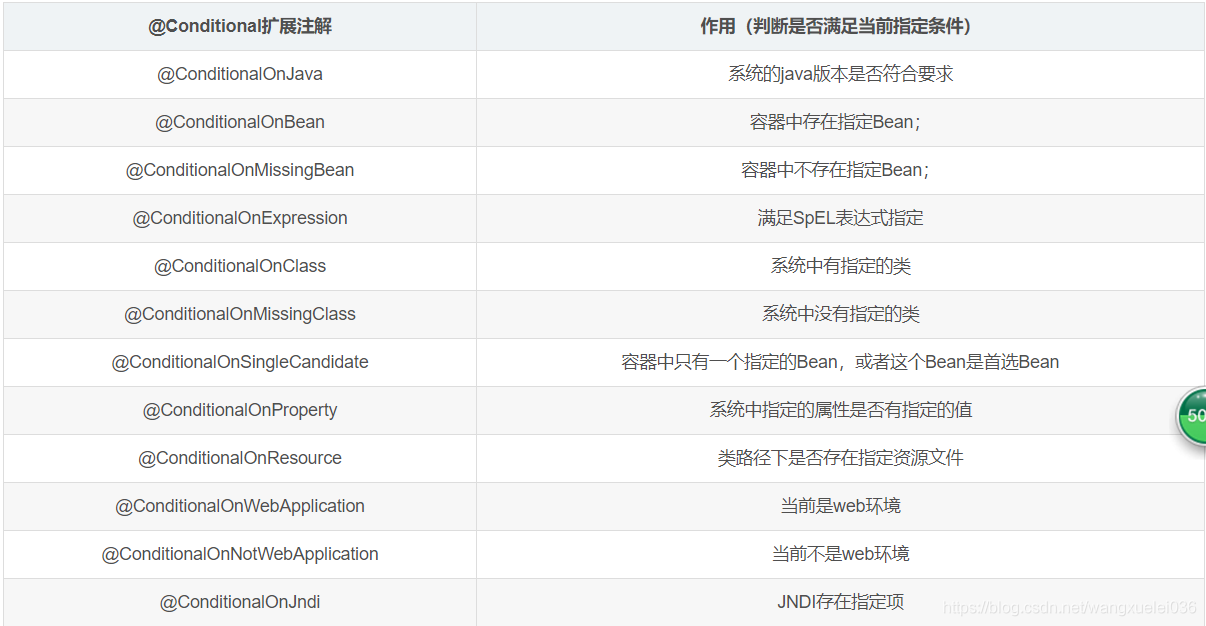
而springboot中这些注解属于@Conditional 的派生注解
当然每一个派生注解都有着对应的处理类与之对应
当然这里只是简单的提一下,后面再具体分析,转入我们的正题,继续直(简)接(单)体(暴)验(力)效果
简单体验下@ConditionalOnProperty
看一下@ConditionalOnProperty 注解中定义的属性极其含义,大致有个印象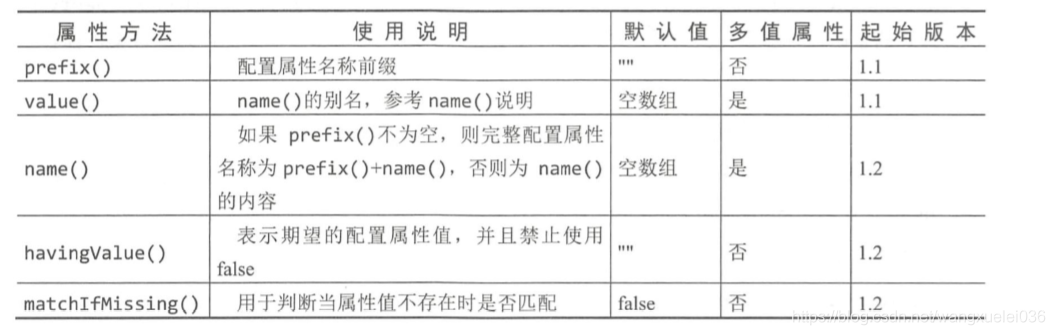
对之前上面的 自定义自动配置类进行 改造,重点关注 @ConditionalOnProperty 标注的地方
import com.autoConfiguration.properties.MyProperties;
import com.autoConfiguration.service.MyService;
import org.springframework.beans.factory.annotation.Autowired;
import org.springframework.boot.autoconfigure.condition.ConditionalOnProperty;
import org.springframework.boot.context.properties.EnableConfigurationProperties;
import org.springframework.context.annotation.Bean;
import org.springframework.context.annotation.Configuration;

@Configuration
@EnableConfigurationProperties(MyProperties.class)
public class MyServiceAutoConfiguration {

    @Autowired
    MyProperties myProperties;
    /**
     * 创建一个bean,一般其他依赖此jar包的项目可以直接使用
     */
    @Bean("MyAutoConfigService")
    MyService myService() {
        MyService myService = new MyService();
        myService.setName(myProperties.getName());
        myService.setMsg(myProperties.getMsg());
        return myService;
    }

    /**
     * 满足 my.service.type = tomcat 或 不配置的时候 创建该对象
     */
    @Bean("MyAutoConfigServiceContainer")
    @ConditionalOnProperty(
            prefix = "my.service",
            value = "type",
            havingValue = "tomcat",
            matchIfMissing = true
    )
    MyService myServiceTomcat() {
        MyService myService = new MyService();
        myService.setName(myProperties.getName());
        myService.setMsg(myProperties.getMsg());
        myService.setType("tomcat");
        return myService;
    }

    /**
     * 满足 my.service.type = jetty 创建该对象
     */
    @Bean("MyAutoConfigServiceContainer")
    @ConditionalOnProperty(
            prefix = "my.service",
            name = "type",
            havingValue = "jetty"
    )
    MyService myServiceJetty() {
        MyService myService = new MyService();
        myService.setName(myProperties.getName());
        myService.setMsg(myProperties.getMsg());
        myService.setType("jetty");
        return myService;
    }

}
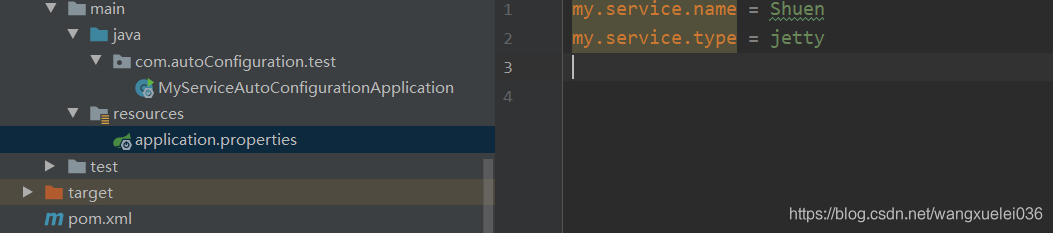
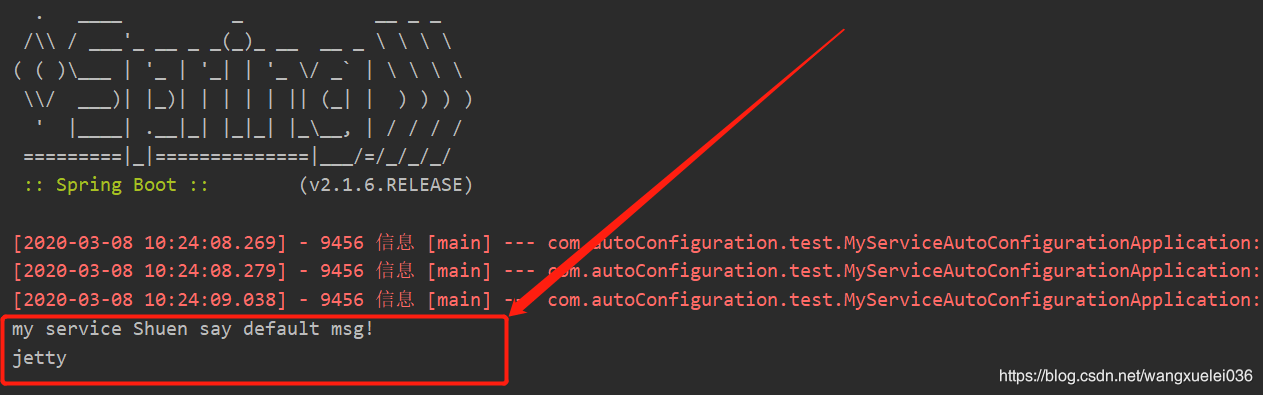
修改依赖该jar的项目的application.properties 文件中的配置信息,注意:my.service.type 配置的值要与你自己再@ConditionalOnProperty 中配置的 havingValue 属性值相对应
my.service.name = Shuen
my.service.type = jetty
然后容器启动测试下,你们就可以准备完美收官了,当然相应项目里面如何能灵活设计并运用就靠你们自己去思考了,我在写个小结就准备下播啦
import com.autoConfiguration.service.MyService;
import org.springframework.boot.WebApplicationType;
import org.springframework.boot.autoconfigure.SpringBootApplication;
import org.springframework.boot.builder.SpringApplicationBuilder;
import org.springframework.context.ConfigurableApplicationContext;

//@EnableAutoConfiguration
@SpringBootApplication
public class MyServiceAutoConfigurationApplication {

    public static void main(String[] args) {
        ConfigurableApplicationContext context = new SpringApplicationBuilder(MyServiceAutoConfigurationApplication.class)
                .web(WebApplicationType.NONE)
                .run(args);
        MyService myAutoConfigService = context.getBean("MyAutoConfigService", MyService.class);
        MyService MyAutoConfigServiceTomcat = context.getBean("MyAutoConfigServiceContainer", MyService.class);
        myAutoConfigService.sayHello();
        System.out.println(MyAutoConfigServiceTomcat.getType());
        context.close();
    }
}

小结:
至此,我们就已经简单的体验了自定义自动装配,通过体验相信已经能大致感受到该特性的魅力所在,当然 springboot 的自动装配以及条件装配特性并不是其自身特有属性,其实该特性也是基于spring扩展而来,接袭来我们将从源码的角度一层层剖析该特性的历史来源。
Behind each strenuously,there will be double reward.
每一次的背后,都有加倍的回报
:集成其他框架及组件")
:两种构建方式、基本配置、两种打包方式")


还没有评论,来说两句吧...