
1.寻找入口(BeanPostProcessor)
postProcessBeforInitialization()
public interface BeanPostProcessor {
    // 为在Bean的初始化前提供回调入口
	@Nullable
	default Object postProcessBeforeInitialization(Object bean, String beanName) throws BeansException {
		return bean;
	}

    // 为在Bean的初始化之后提供回调入口
	@Nullable
	default Object postProcessAfterInitialization(Object bean, String beanName) throws BeansException {
		return bean;
	}
}
这两个回调的入口都是和容器管理的 Bean 的生命周期事件紧密相关,可以为用户提供在 Spring IOC 容器初始化Bean过程中自定义的处理操作。
2.对生成的Bean添加后置处理器(AbstractAutowireCapableBeanFactory)
BeanPostProcessor后置处理器的调用发生在 Spring IOC 容器完成对Bean实例对象的创建和属性的依赖注入完成之后。
在对Spring依赖注入的源码分析过程中我们知道,当应用程序第一次调用getBean()方法(lazy-init预实例化除外)向Spring IOC 容器索取指定 Bean时,触发 Spring IOC 容器创建Bean实例对象并进行依赖注入的过程。其中真正实现创建 Bean 对象并进行依赖注入的方法是AbstractAutowireCapableBeanFactory 类的doCreateBean()方法,主要源码如下:
doCreateBean()
// 真正创建Bean的方法
protected Object doCreateBean(final String beanName, final RootBeanDefinition mbd, final @Nullable Object[] args)
      throws BeanCreationException {

   // ...创建bean实例对象

   // Initialize the bean instance.
   // Bean对象的初始化,依赖注入在此触发这个exposedObject在初始化完成之后返回作为依赖注入完成后的Bean
   Object exposedObject = bean;
   try {
      // 将Bean实例对象封装,并且Bean定义中配置的属性值赋值给实例对象
      populateBean(beanName, mbd, instanceWrapper);
      // 初始化Bean对象
      exposedObject = initializeBean(beanName, exposedObject, mbd);
   }
   catch (Throwable ex) {
      if (ex instanceof BeanCreationException && beanName.equals(((BeanCreationException) ex).getBeanName())) {
         throw (BeanCreationException) ex;
      }
      else {
         throw new BeanCreationException(
               mbd.getResourceDescription(), beanName, "Initialization of bean failed", ex);
      }
   }

   ...

   // 为应用返回所需要的对象
   return exposedObject;
}
从上面的代码中我们知道,为 Bean 实例对象添加 BeanPostProcessor 后置处理器的入口的是initializeBean()方法。
initializeBean()
为容器产生的Bean实例对象添加BeanPostProcessor后置处理器
同样在 AbstractAutowireCapableBeanFactory 类中,initializeBean()方法实现为容器创建的 Bean 实例对象添加BeanPostProcessor后置处理器,源码如下:
// 初始容器创建的Bean实例对象,为其添加BeanPostProcessor后置处理器
protected Object initializeBean(final String beanName, final Object bean, @Nullable RootBeanDefinition mbd) {
   // JDK的安全机制验证权限
   if (System.getSecurityManager() != null) {
      // 实现PrivilegedAction接口的匿名内部类
      AccessController.doPrivileged((PrivilegedAction<Object>) () -> {
      	invokeAwareMethods(beanName, bean);
        return null;
      }, getAccessControlContext());
   }
   else {
      // 为Bean实例对象包装相关属性,如名称,类加载器,所属容器等信息
      invokeAwareMethods(beanName, bean);
   }

   Object wrappedBean = bean;
   // 对BeanPostProcessor后置处理器的postProcessBeforeInitialization回调方法的调用,为Bean实例初始化前做一些处理
   if (mbd == null || !mbd.isSynthetic()) {
      wrappedBean = applyBeanPostProcessorsBeforeInitialization(wrappedBean, beanName);
   }

   // 调用Bean实例对象初始化的方法,这个初始化方法是在Spring Bean定义配置文件中通过init-method属性指定的
   try {
      invokeInitMethods(beanName, wrappedBean, mbd);
   }
   catch (Throwable ex) {
      throw new BeanCreationException(
            (mbd != null ? mbd.getResourceDescription() : null),beanName, "Invocation of init method failed", ex);
   }
   // 对BeanPostProcessor后置处理器的postProcessAfterInitialization回调方法的调用,为Bean实例初始化之后做一些处理
   if (mbd == null || !mbd.isSynthetic()) {
      wrappedBean = applyBeanPostProcessorsAfterInitialization(wrappedBean, beanName);
   }

   return wrappedBean;
}
applyBeanPostProcessorsAfterInitialization()
调用BeanPostProcessor后置处理器实例对象初始化之后的处理方法
public Object applyBeanPostProcessorsAfterInitialization(Object existingBean, String beanName)throws BeansException {

   Object result = existingBean;
   // 遍历容器为所创建的Bean添加的所有BeanPostProcessor后置处理器
   for (BeanPostProcessor beanProcessor : getBeanPostProcessors()) {
      // 调用Bean实例所有的后置处理中的初始化后处理方法,为Bean实例对象在初始化之后做一些自定义的处理操作
      Object current = beanProcessor.postProcessAfterInitialization(result, beanName);
      if (current == null) {
         return result;
      }
      result = current;
   }
   return result;
}
3.选择代理策略(AbstractAutoProxyCreator)
BeanPostProcessor是一个接口,其初始化前的操作方法和初始化后的操作方法均委托其实现子类来实现,在Spring中,BeanPostProcessor的实现子类非常的多,分别完成不同的操作,如:AOP 面向切面编程的注册通知适配器、Bean对象的数据校验、Bean继承属性、方法的合并等等。
我们以最简单的AOP 切面织入来简单了解其主要的功能。下面我们来分析其中一个创建 AOP 代理对象的子类AbstractAutoProxyCreator类。该类重写了postProcessAfterInitialization()方法。
postProcessAfterInitialization()
public Object postProcessAfterInitialization(@Nullable Object bean, String beanName) throws BeansException {
   if (bean != null) {
      Object cacheKey = getCacheKey(bean.getClass(), beanName);
      if (!this.earlyProxyReferences.contains(cacheKey)) {
         return wrapIfNecessary(bean, beanName, cacheKey);
      }
   }
   return bean;
}
wrapIfNecessary()
protected Object wrapIfNecessary(Object bean, String beanName, Object cacheKey) {
   if (StringUtils.hasLength(beanName) && this.targetSourcedBeans.contains(beanName)) {
      return bean;
   }
   // 判断是否不应该代理这个bean
   if (Boolean.FALSE.equals(this.advisedBeans.get(cacheKey))) {
      return bean;
   }
   /*
   	* 判断是否是一些InfrastructureClass或者是否应该跳过这个bean。
   	* 所谓InfrastructureClass就是指Advice/PointCut/Advisor等接口的实现类。
   	* shouldSkip默认实现为返回false,由于是protected方法,子类可以覆盖。
    */
   if (isInfrastructureClass(bean.getClass()) || shouldSkip(bean.getClass(), beanName)) {
      this.advisedBeans.put(cacheKey, Boolean.FALSE);
      return bean;
   }

   // 获取这个bean的advice
   // Create proxy if we have advice.
   Object[] specificInterceptors = getAdvicesAndAdvisorsForBean(bean.getClass(), beanName, null);
   if (specificInterceptors != DO_NOT_PROXY) {
      this.advisedBeans.put(cacheKey, Boolean.TRUE);
      // 创建代理
      Object proxy = createProxy(
            bean.getClass(), beanName, specificInterceptors, new SingletonTargetSource(bean));
      this.proxyTypes.put(cacheKey, proxy.getClass());
      return proxy;
   }

   this.advisedBeans.put(cacheKey, Boolean.FALSE);
   return bean;
}
createProxy()
protected Object createProxy(Class<?> beanClass, @Nullable String beanName,
      @Nullable Object[] specificInterceptors, TargetSource targetSource) {

   if (this.beanFactory instanceof ConfigurableListableBeanFactory) {
      AutoProxyUtils.exposeTargetClass((ConfigurableListableBeanFactory) this.beanFactory, beanName, beanClass);
   }

   ProxyFactory proxyFactory = new ProxyFactory();
   proxyFactory.copyFrom(this);

   if (!proxyFactory.isProxyTargetClass()) {
      if (shouldProxyTargetClass(beanClass, beanName)) {
         proxyFactory.setProxyTargetClass(true);
      }
      else {
         evaluateProxyInterfaces(beanClass, proxyFactory);
      }
   }

   Advisor[] advisors = buildAdvisors(beanName, specificInterceptors);
   proxyFactory.addAdvisors(advisors);
   proxyFactory.setTargetSource(targetSource);
   customizeProxyFactory(proxyFactory);

   proxyFactory.setFrozen(this.freezeProxy);
   if (advisorsPreFiltered()) {
      proxyFactory.setPreFiltered(true);
   }

   return proxyFactory.getProxy(getProxyClassLoader());
}
整个过程跟下来,我发现最终调用的是 proxyFactory.getProxy()方法。到这里我们大概能够猜到proxyFactory 有JDK和CGLib的,那么我们该如何选择呢?最终调用的是DefaultAopProxyFactory的createAopProxy()方法:
4.创建代理(DefaultAopProxyFactory)
createAopProxy()
public class DefaultAopProxyFactory implements AopProxyFactory, Serializable {

   @Override
   public AopProxy createAopProxy(AdvisedSupport config) throws AopConfigException {
      if (config.isOptimize() || config.isProxyTargetClass() ||
          hasNoUserSuppliedProxyInterfaces(config)) {
         Class<?> targetClass = config.getTargetClass();
         if (targetClass == null) {
            throw new AopConfigException("TargetSource cannot determine target class: " +
                  "Either an interface or a target is required for proxy creation.");
         }
         if (targetClass.isInterface() || Proxy.isProxyClass(targetClass)) {
            return new JdkDynamicAopProxy(config);
         }
         return new ObjenesisCglibAopProxy(config);
      }
      else {
         return new JdkDynamicAopProxy(config);
      }
   }

}
hasNoUserSuppliedProxyInterfaces()
  /**
    * Determine whether the supplied {@link AdvisedSupport} has only the
    * {@link org.springframework.aop.SpringProxy} interface specified
    * (or no proxy interfaces specified at all).
    */
   private boolean hasNoUserSuppliedProxyInterfaces(AdvisedSupport config) {
      Class<?>[] ifcs = config.getProxiedInterfaces();
      return (ifcs.length == 0 || (ifcs.length == 1 && SpringProxy.class.isAssignableFrom(ifcs[0])));
   }
5.织入代理对象(JdkDynamicAopProxy)
分析调用逻辑之前先上类图,看看Spring中主要的AOP 组件:
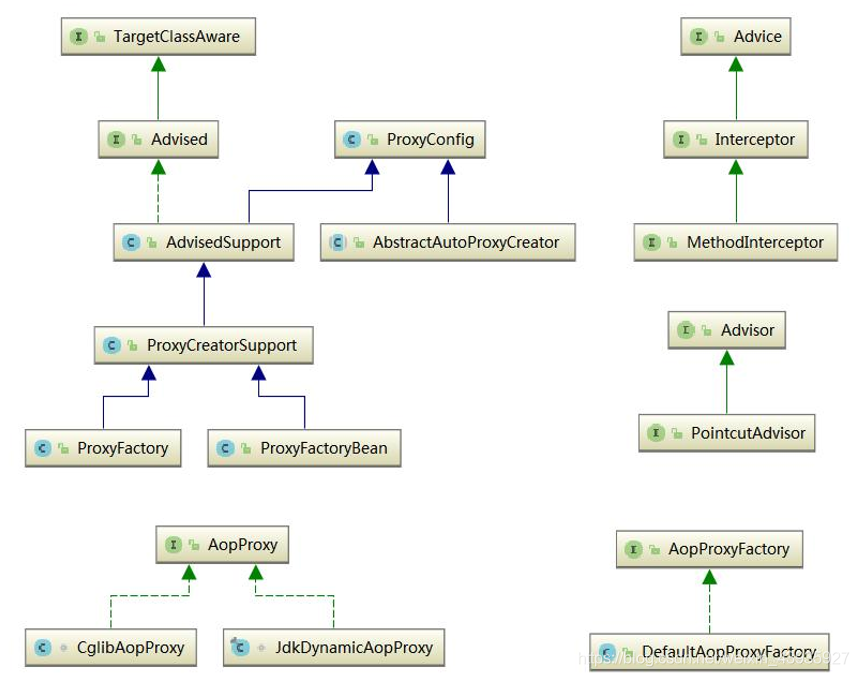
上面我们已经了解到 Spring 提供了两种方式来生成代理方式有 JDKProxy和 CGLib。下面我们来研究一下Spring 如何使用JDK来生成代理对象,具体的生成代码放在 JdkDynamicAopProxy这个类中,直接上相关代码:
getProxy()
/**
 * 获取代理类要实现的接口,除了Advised对象中配置的,还会加上SpringProxy, Advised(opaque=false)
 * 检查上面得到的接口中有没有定义 equals或者hashcode的接口
 * 调用Proxy.newProxyInstance创建代理对象
 */
@Override
public Object getProxy(@Nullable ClassLoader classLoader) {
   if (logger.isDebugEnabled()) {
      logger.debug("Creating JDK dynamic proxy: target source is " + this.advised.getTargetSource());
   }
   Class<?>[] proxiedInterfaces = AopProxyUtils.completeProxiedInterfaces(this.advised, true);
   findDefinedEqualsAndHashCodeMethods(proxiedInterfaces);
   return Proxy.newProxyInstance(classLoader, proxiedInterfaces, this);
}
通过注释我们应该已经看得非常明白代理对象的生成过程,此处不再赘述。下面的问题是,代理对象生成了,那切面是如何织入的?
我们知道 InvocationHandler 是 JDK 动态代理的核心,生成的代理对象的方法调用都会委托到 InvocationHandler.invoke()方法。而从 JdkDynamicAopProxy 的源码我们可以看到这个类其实也实现了InvocationHandler,下面我们分析SpringAOP 是如何织入切面的,直接上源码看invoke()方法:
invoke()
public Object invoke(Object proxy, Method method, Object[] args) throws Throwable {
   MethodInvocation invocation;
   Object oldProxy = null;
   boolean setProxyContext = false;

   TargetSource targetSource = this.advised.targetSource;
   Object target = null;

   try {
      // eqauls()方法,具目标对象未实现此方法
      if (!this.equalsDefined && AopUtils.isEqualsMethod(method)) {
         // The target does not implement the equals(Object) method itself.
         return equals(args[0]);
      }
      // hashCode()方法,具目标对象未实现此方法
      else if (!this.hashCodeDefined && AopUtils.isHashCodeMethod(method)) {
         // The target does not implement the hashCode() method itself.
         return hashCode();
      }
      else if (method.getDeclaringClass() == DecoratingProxy.class) {
         // There is only getDecoratedClass() declared -> dispatch to proxy config.
         return AopProxyUtils.ultimateTargetClass(this.advised);
      }
      // Advised接口或者其父接口中定义的方法,直接反射调用,不应用通知
      else if (!this.advised.opaque && method.getDeclaringClass().isInterface() &&
            method.getDeclaringClass().isAssignableFrom(Advised.class)) {
         // Service invocations on ProxyConfig with the proxy config...
         return AopUtils.invokeJoinpointUsingReflection(this.advised, method, args);
      }

      Object retVal;

      if (this.advised.exposeProxy) {
         // Make invocation available if necessary.
         oldProxy = AopContext.setCurrentProxy(proxy);
         setProxyContext = true;
      }

      // Get as late as possible to minimize the time we "own" the target,
      // in case it comes from a pool.
      // 获得目标对象的类
      target = targetSource.getTarget();
      Class<?> targetClass = (target != null ? target.getClass() : null);

      // Get the interception chain for this method.
      // 获取可以应用到此方法上的Interceptor列表
      List<Object> chain = this.advised.getInterceptorsAndDynamicInterceptionAdvice(method, targetClass);

      // Check whether we have any advice. If we don't, we can fallback on direct
      // reflective invocation of the target, and avoid creating a MethodInvocation.
      // 如果没有可以应用到此方法的通知(Interceptor),此直接反射调用 method.invoke(target, args)
      if (chain.isEmpty()) {
         // We can skip creating a MethodInvocation: just invoke the target directly
         // Note that the final invoker must be an InvokerInterceptor so we know it does
         // nothing but a reflective operation on the target, and no hot swapping or fancy
         Object[] argsToUse = AopProxyUtils.adaptArgumentsIfNecessary(method, args);
         retVal = AopUtils.invokeJoinpointUsingReflection(target, method, argsToUse);
      }
      else {
         // We need to create a method invocation...
         // 创建MethodInvocation
         invocation = new ReflectiveMethodInvocation(proxy, target, method, args, targetClass, chain);
         // Proceed to the joinpoint through the interceptor chain.
         retVal = invocation.proceed();
      }

      // Massage return value if necessary.
      Class<?> returnType = method.getReturnType();
      if (retVal != null && retVal == target &&
            returnType != Object.class && returnType.isInstance(proxy) &&
            !RawTargetAccess.class.isAssignableFrom(method.getDeclaringClass())) {
         // Special case: it returned "this" and the return type of the method is type-compatible.
         // Note that we can't help if the target sets a reference to itself in another returned object.
         retVal = proxy;
      }
      else if (retVal == null && returnType != Void.TYPE && returnType.isPrimitive()) {
         throw new AopInvocationException(
               "Null return value from advice does not match primitive return type for: " + method);
      }
      return retVal;
   }
   finally {
      if (target != null && !targetSource.isStatic()) {
         // Must have come from TargetSource.
         targetSource.releaseTarget(target);
      }
      if (setProxyContext) {
         // Restore old proxy.
         AopContext.setCurrentProxy(oldProxy);
      }
   }
}
主要实现思路可以简述为:首先获取应用到此方法上的通知链(InterceptorChain)。如果有通知,则应用通知,并执行 JoinPoint;如果没有通知,则直接反射执行JoinPoint。而这里的关键是通知链是如何获取的以及它又是如何执行的呢?请看下一篇文章…

")


还没有评论,来说两句吧...